| Disclaimer: I get commissions for purchases made through links in this post. |
One size cloth diapers are wonderful because they fit small babies up through toddlerhood. They are very simple to adjust, too, but they can be confusing at first. What makes them confusing? Snaps galore! In this article, I’ll show you how to use a one size cloth diaper and properly utilize all of those snaps.

One Size Cloth Diaper Snaps
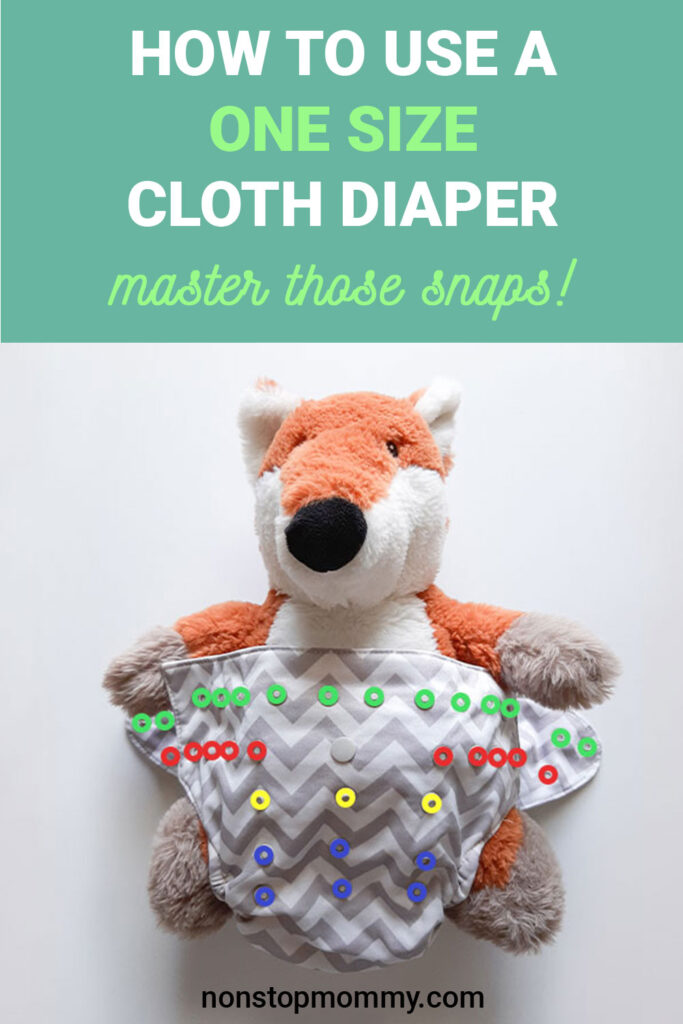
Today, Fluff Bum Fox is going to model for us. Let’s start with a quick rundown of the different snaps on a one size cloth diaper. You can reference the picture below.

Waist snaps
The waist snaps adjust the fit around the waist. In the above picture, they are marked with the color green.
Rise snaps
The rise snaps adjust the diaper’s length up and down. These snaps are very important for making the diaper smaller for younger babies. Depending on your child’s size, you can snap the bottom row (smallest size) or middle row (medium size) to the top row of rise snaps. If you are diapering a larger child, the rise snaps don’t have to be snapped at all.
In the picture, the top row of rise snaps are marked with yellow and the middle and bottom rows are marked with blue. Similar to the waist snaps, the rise snaps can be customized to your child’s size. This is the beauty of one size cloth diapers.
Hip snaps
The last snaps I want to point out are the hip snaps. You can see them above marked with red. If you’ve ever used disposable diapers, you’ve probably experienced “wing droop.” The hip snaps help keep “wing droop” from occurring. Not all cloth diapers have this three snap setup on the flaps. Personally, I find the three snap setup to work the best.
Putting on a one size cloth diaper
1. Adjust the rise snaps if needed.

2. Lay the cloth diaper out. If using a pocket diaper, make sure you have your insert stuffed inside the pocket. If you’re using a cover, either pin or snappi the diaper flat onto your baby or pad fold the diaper flat (like in the picture).
3. Lay your baby on top of the diaper, and pull the one size diaper up between the legs.

4. Snap the waist and hip snaps into place. I like to snap the hip snap first, then the waist snap directly above, and lastly, the innermost waist snap. It doesn’t have to be done that way, but I do find it to be the easiest. See the picture above for a visual explanation.

5. Use your fingers to push the extra fabric fold from the rise snaps up. This just helps pull out any slack from the legs.
That’s all there is to it!
Fit Check Tip: You may want to do a fit check to ensure the leg gussets are fitted to your baby’s legs. It doesn’t need to be tight. Also, a gap in the front at the waist is generally okay. Just make sure it doesn’t gap in the back. Ultimately, you’ll find out if the fit is off with some trial and error.
One size cloth diapers are easy
And there you have it! It’s super simple to use one size cloth diapers. I hope this article and pictures were helpful! Have questions? Comment below, and I’ll do my best to answer them.
You may also enjoy reading:


